Feeds:
Posts
Comments

Archive for the ‘Side dishes’ Category

Pause

Hello friends!

I am thrilled to tell you that I had my first day of law school today! Very exciting and overwhelming… I have no idea how busy I’ll be (in this new home in this new city at this new school), but I will try my best to continue sharing the recipes I love to make and eat!

In the meantime, please check out my latest post here.

Thank you all for reading,

Robin

xo

Read Full Post »

Photo by me

I made this recipe a while back as a contribution to One Green Planet, but it was too pretty not to share with you all. I wanted to make a colourful potato salad that seemed both classic and innovative. I used multi-coloured sweet potatoes from our local farmer’s market and added sweet corn, bell peppers, onions, jalapeno and cilantro. This pretty little dish has both a spicy bite from a touch of cayenne and a burst of freshness from its simple lime dressing. Summer picnic food at its best!

Spicy sweet potato salad (Serves 6-8 as a side dish)

Salad ingredients:

  • 1 lb. sweet potatoes (multicolored if available), peeled and cut into ½ inch cubes
  • 1 tsp. cumin
  • ½ tsp. cayenne pepper
  • 2 tbsp. vegetable oil
  • salt and pepper to taste
  • 3 cups cooked corn (fresh or frozen)
  • 4 scallions, trimmed and sliced
  • 1 red bell pepper, diced
  • ½ jalapeno pepper, finely chopped
  • ¼ cup cilantro, chopped for garnish
  • Dressing Ingredients
  • ¼ cup vegetable oil
  • 1 garlic clove, minced
  • zest and juice of 1 lime
  • salt and pepper to taste

Preheat oven to 400 degrees. Toss the sweet potatoes in the vegetable oil, cumin, cayenne, salt and pepper. Bake on an aluminum foil-lined sheet for 20-25 minutes, turning once. Set aside to cool. Meanwhile, in a large bowl, add the cooked corn, scallions, bell pepper and jalapeno and toss to combine.

To prepare the simple citrus dressing, simply whisk together of all the ingredients.

Add the potatoes and dressing to the bowl and toss everything together. Garnish with fresh cilantro and enjoy!

Read Full Post »

Guys- I’m on a cooking show! And not just any show, but The Hot Plate, a popular internet show hosted and produced by the two lovely ladies, Amanda and April. This was my first foray into cooking on camera, so excuse my sporadic shifty eyes and awkward smiles. But hey, I tried, right? AND this quinoa recipe of Amanda’s is so delicious, I’ll definitely be adding it to my repertoire.

Please have a look and share your thoughts!

Robin xo

Read Full Post »

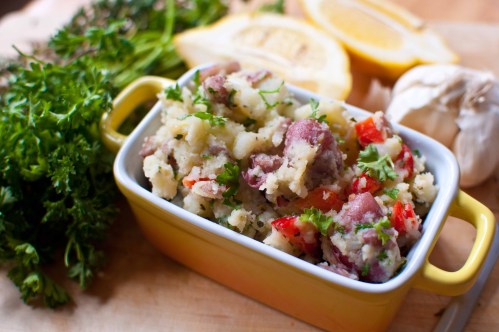
photo by me

Hello readers and fellow foodies! First of all, I want to give a HUGE thank you to WordPress for featuring me on their “freshly pressed” page earlier this week! It’s truly amazing to receive so much positive feedback from all you readers out there and it really inspires me to keep churning out yummy recipes. Enter: the simple smashed potatoes pictured above. This dish was one of those classic “what do I do with this bag of potatoes that won’t last much longer?” dishes. I had a few fresh herbs on hands, so I decided to boil and smash the potatoes and inject a ton of herbaciousness (a made up word?)! In addition to the herbs, garlic, lemon and olive oil, I threw in some diced bell peppers for some extra colour and crunch. This simple dish is low on the difficulty scale but packed with big flavour! What more could you want from a humble bowl o’ taters anyway?

Herby smashed potatoes
Serves 4 as a side

1 lb mini red potatoes (or whichever variety you happen to have)
1/3 cup olive oil
juice and zest of 1/2 lemon
1 small clove garlic, grated or pressed
1 tsp dried oregano
1 tsp fresh thyme
1 tbsp fresh curly leaf parsley, roughly chopped
1/4 bell pepper, finely diced
salt and pepper to taste

Begin by bringing a large pot of water to a boil and add the potatoes in whole. Boil until fork tender, about 10 minutes or so. Drain the taters and and smash them with a potato masher, but don’t go overboard, chunks are your friend in this rustic dish! Stir in all of the other ingredients, making sure to add a generous sprinkling of both salt and pepper. Although this dish is just as tasty when served cold, I have to say that enjoying it warm is so much more comforting!

Have a delicious weekend my friends.

Read Full Post »

photo by pwisenberg

I tweaked this recipe from an episode of Chef at Home. Michael Smith was trying to come up with a way to get his son Gabe (the cuuutest) to eat carrots, so he decided to make them taste like apple pie. The carrots are simmered in apple cider and cinnamon and finished with raisins and chopped walnuts (my idea!). The result is a sweet and healthy side dish that anyone (even 3-year olds) will love!

Apple pie carrots
Serves 2-4

1 lb carrots, peeled and sliced
3/4 cup apple cider or juice
pinch each of cinnamon and salt
one pat of Earth Balance butter
1/4 cup raisins
1/4 cup chopped walnuts

Simmer the carrots in the cider, butter, cinnamon and salt until just fork-tender. Drain the excess liquid and toss with the nuts and raisins. That’s it!

Read Full Post »

photos by me & pwisenberg

Siiiigh… what do you get when you combine mushrooms, onions, garlic and baguette? Pure gastronomical bliss, that’s what. This is one of my absolute favourite indulgences and it’s so so easy. Just sauté the onions, garlic and mushrooms in a little oil… and maybe a little butter too (dairy-free of course), spoon it onto some toasted bread and voila!

Mushroom garlic crostini
Serves 2

6 slices fresh baguette
1 cup mushrooms, sliced (I used button mushrooms and portobellos)
4 scallions, chopped
3 cloves garlic, minced
1/2 tsp chili flakes
1 tbsp olive oil
1 tsp Earth Balance butter
2 tbsp vegetable stock
salt and pepper to taste

Preheat oven to 425 degrees. Lightly brush bread with olive oil and bake until golden brown, about 10 minutes. Meanwhile, heat the oil and butter in a skillet over medium heat. Sauté the garlic for a brief moment before adding the onions and mushrooms. Season with salt, pepper and chili flakes and cook for several minutes, until the mushrooms have lost most of their water. Add a splash of veggie stock and simmer until the liquid has evaporated. Spoon this delicious mixture onto the crostini and revel in its savoury scrumptiousness. Mmm, I kind of want some right now…


Read Full Post »

photos by me

I like to think of this dish as my interpretation of buffalo wings and fries… a bit of a stretch, I know. That being said, this does not taste nearly as healthy as it truly is- always a good thing! I baked the chickpeas (sans-oil) until they were hot and crispy, and then tossed them in good old-fashioned  buffalo sauce. My “fries” are clearly not really fries at all, but a surprisingly delicious cauliflower mash. It’s very low in fat, yet just as fluffy and flavourful as mashed potatoes. I topped the whole thing off with fresh scallions, and the dish really had all of the familiar pub-food flavours that we all love- without all the bad things that typically go along with them! Paul and I had this for dinner last night and he agreed that it was super yummy and completely satisfying. I urge you all to try this one…

Buffalo baked chick peas with cauliflower mash
Makes 2 dinner-sized portions

Buffalo baked chickpeas

1 can chickpeas, drained and rinsed until they are quite dry
salt and pepper
1/3 cup buffalo sauce

Cauliflower mash

1 head cauliflower, cut into florets
1 tbsp olive oil
1/2 onion, chopped
2 cloves garlic, chopped
salt and pepper
pinch of nutmeg
1 cup non-dairy milk
4 scallions, chopped

Preheat oven to 400 degrees .Spread the chickpeas evenly on a baking sheet and sprinkle with salt and pepper. Bake for about 20 minutes, turning occasionally, until golden and crispy. Set aside to cool before tossing in the buffalo sauce.

Add the cauliflower florets to a large pot of boiling, salted water and cook until fork-tender. Meanwhile, heat oil in a skillet over medium heat. Add onions and garlic and season with salt, pepper, and nutmeg. Cook until soft and translucent. Drain cauliflower and wipe pot dry. Transfer cauliflower, onions and garlic back to pot with the milk and simmer until liquid has almost entirely evaporated. Mash or purée until smooth. Rectify the seasoning if necessary. Serve chickpeas over cauliflower mash and garnish with fresh scallions.

And there you have it folks, just an easy lil’ weekday dinner that everyone will love. Wishing you all a happy Wednesday!

Read Full Post »
Older Posts »